
Gotta Leak? Tim's Got The Fix: His Favorite Leak Repair Sealing Method!
The topic of which sealing method is best is often debated amongst industry leak sealing technicians. Leak sealing in pressurized piping systems is one of those jobs where the right design can mean the difference between a quick, reliable repair and costly, recurring issues. In this article, Tim Gaida, a Professional Engineer, details his preferred kind of seal for a leak repair enclosures, how it works, and why he likes it.
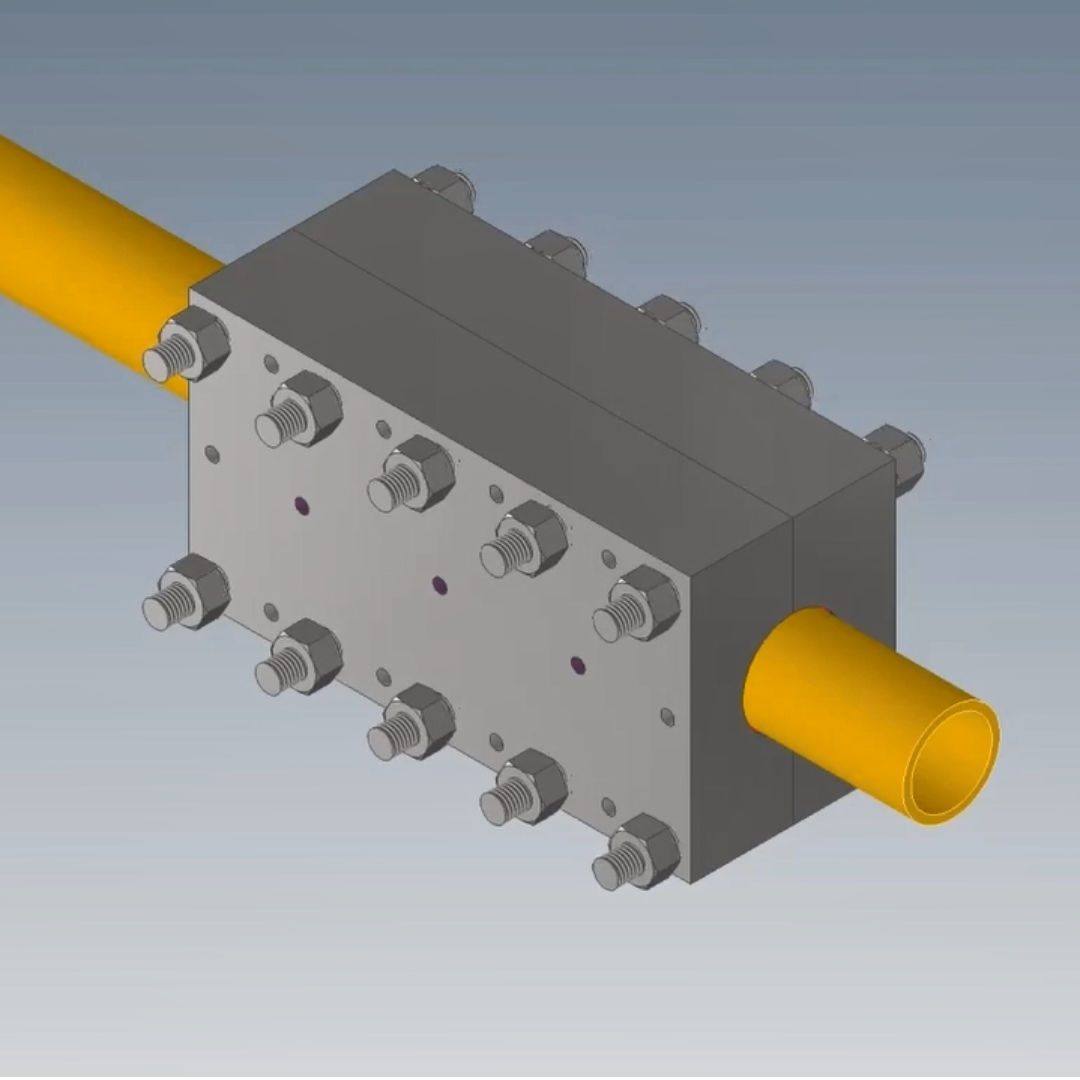
The Seal Design
This setup combines static sealing elements with injectable components in a layered system. Here’s how it’s arranged:
Split Line Seal: A single perimeter injection groove along one half of the enclosure.
Bore Seals: Each bore contains three components in sequence:
An inner graphite rope packing seal
A center injection groove
An outer graphite rope packing seal
Backup Option: Blind void fill injection ports on the outside of the enclosure, undrilled unless needed.
This design balances mechanical sealing, injectable flexibility, and redundancy — all while keeping installation practical.

How this Seal Works
The rope packing is required to create a barrier, not to seal the leak itself. While there are many types of static seals, graphite rope packing is my preferred choice as it is stiff, but it still compresses nicely against the object its landing on.
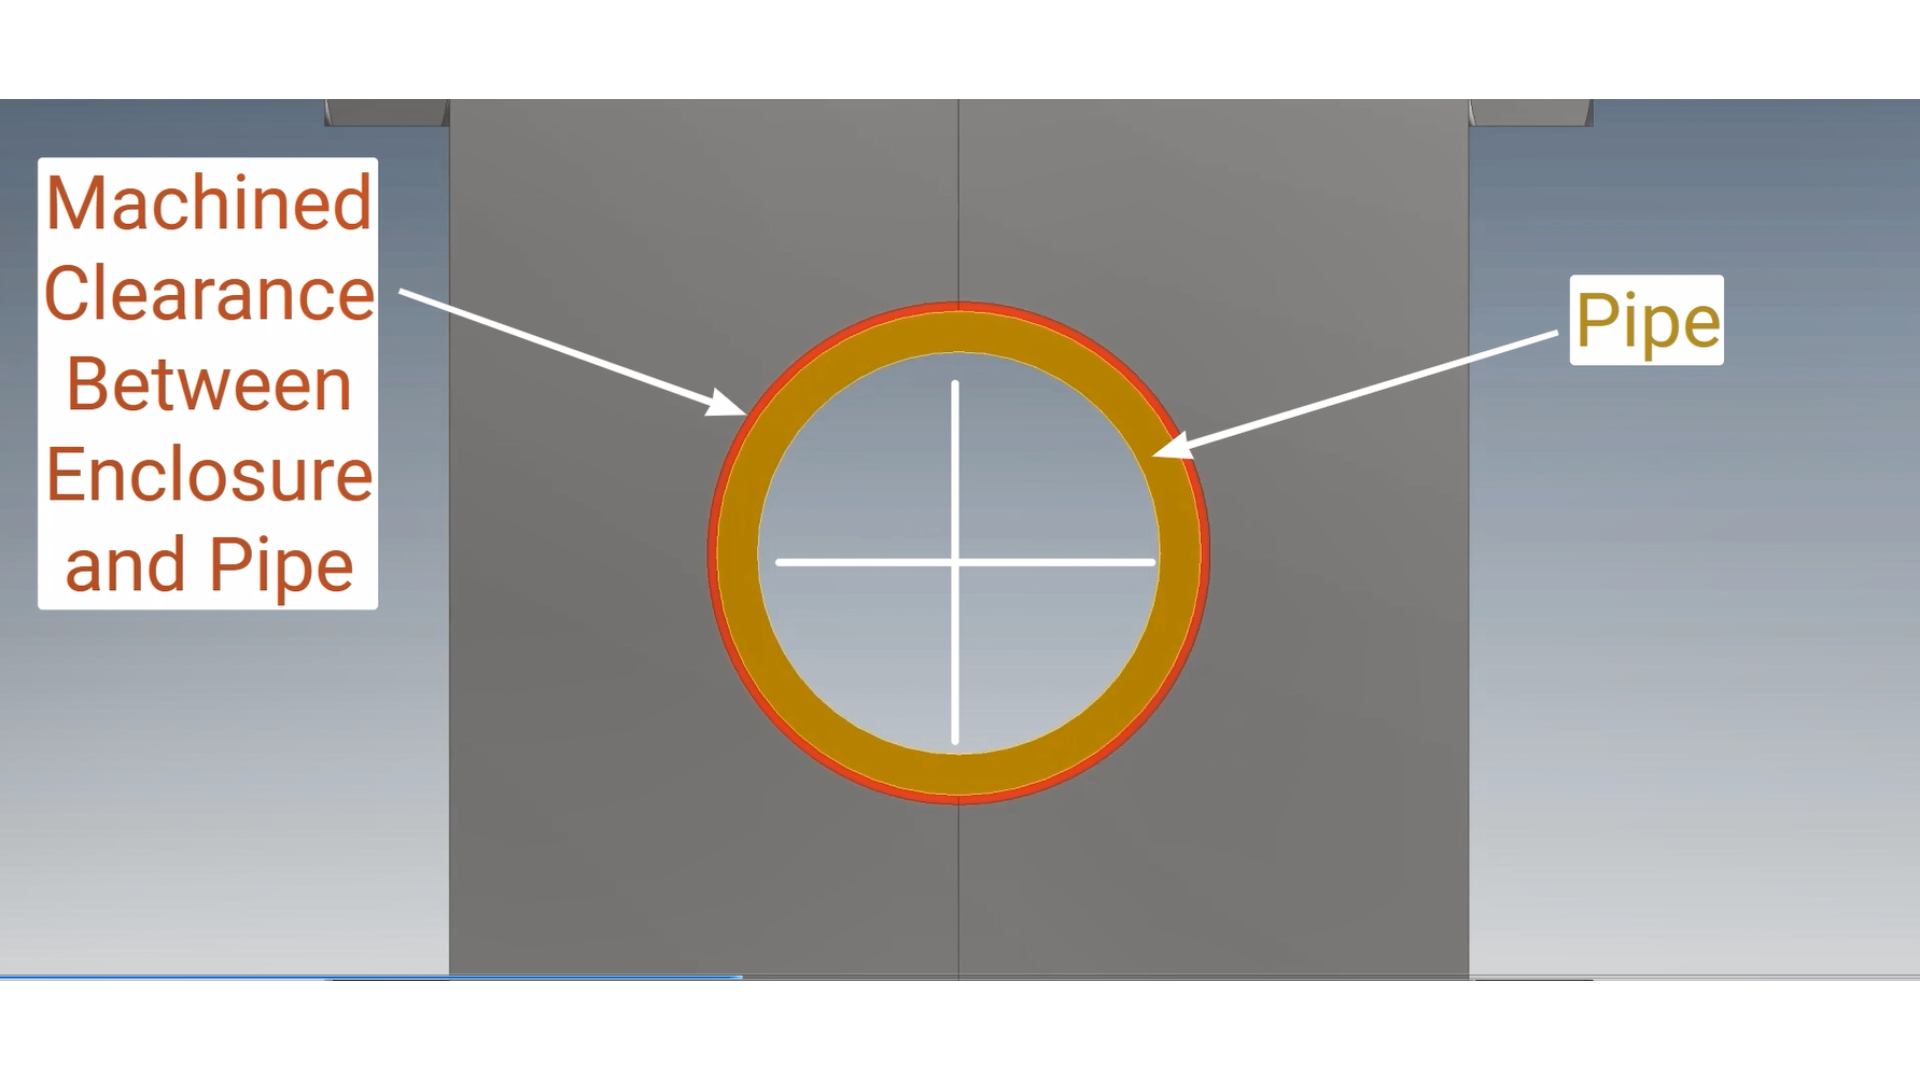
The graphite packing is needed, because on the bores of the enclosure there is always a little bit of clearance, typically between 0.05 – 0.125 on diameter. This allows the enclosure to slide onto the pipe. To take up that gap, we need a static seal or the enclosure would be very loose, and the sealant would extrude out through the bore.

The packing compresses against the pipe, and then injectable sealant is pumped in-between the two packing seals, which takes up all gaps, and imperfections, and then forms the seal to contain the leak.
Why Graphite Rope Packing?
Graphite rope packing is the unsung hero of this design. While it doesn’t directly seal the leak, it plays a crucial role:
Compression & Conformability: Graphite packing is stiff enough to create a reliable barrier, but it also compresses against the pipe, adapting to minor imperfections like flat spots, weld seams, or surface pitting.
Elastic Recovery: If bumped during installation, it springs back partially, reducing the risk of installation errors leading to poor sealing.
Thermal & Chemical Resistance: Graphite handles a wide temperature range and resists chemical attack better than many elastomer-based packings, making it suitable for diverse services.
Without this packing, the small clearance between the enclosure bore and the pipe (typically 0.05–0.125") would act as a leak path, allowing injected sealant to extrude. The packing creates the “barrier walls” needed to contain the sealant where it belongs.
On the perimeter, there is no gap, so the packing grooves are not required. The split lines come completely together, and then sealant is injected into the perimeter groove, which stops fluid from leaking.

Once the rope packing is in place, injectable sealant is pumped into the center groove between the two packing rings. The sealant fills micro-gaps, surface irregularities, and clearances, forming the actual pressure-containing seal.
On the bores: The dual-packing plus sealant system prevents leakage along the pipe interface.
On the split line: Sealant injected into the perimeter groove stops leaks from escaping outward.
This layered defense provides both flexibility and certainty, unlike purely static seals which can fail if the pipe or enclosure surface isn’t perfect.
The Role of Void Fill Injection Ports
Perhaps the most underrated feature is the blind void fill ports. These aren’t drilled through initially, but they’re there if needed.
Backup Plan: If the perimeter seal doesn’t hold — especially in challenging cases like hydrogen service — the void fill option provides a secondary sealing mechanism.
Cost Savings: By leaving them blind initially, we avoid adding unnecessary injectors (which can cost ~$100 each) and eliminate extra leak paths.
Flexibility: If troubleshooting is required, you’ve got an alternative sealing pathway without redesigning or re-machining the enclosure.
How This Compares to Alternative Methods
Many conventional enclosures rely solely on static packing or single-injection seals. While these can work, they come with limitations:
Packing-only designs: Depend heavily on surface finish and fit-up. Any imperfection can compromise performance.
Single-injection seals: Sealant extrusion is common if there’s no packing to confine it, leading to messy, unreliable results.
Over-engineered solutions: Some designs add multiple injectors and ports everywhere “just in case,” but this raises costs and creates additional leak paths.
The method described here hits the sweet spot: robust, adaptable, and economical.
Benefits of This Leak Sealing Solution
Reliability: Combines mechanical sealing with injectable adaptability.
Versatility: Handles irregular surfaces and works across services from steam to aggressive gases.
Cost Efficiency: Fewer injectors and ports mean lower hardware and labor costs.
Redundancy: Built-in contingency (blind ports) provides confidence in tricky applications.
Ease of Installation: Packing’s compressibility makes fit-up more forgiving.
Final Thoughts
This seal design is more than just a preference — it’s the result of years of practical experience with what works in the field. By combining graphite rope packing, carefully placed injection grooves, and strategic backup ports, we get a solution that is simple, flexible, and dependable.
In an industry where leaks are inevitable but downtime is costly, having a sealing method you can trust is invaluable.
If you found this information useful and want to learn more about advanced leak repair methods, don’t forget to subscribe to our channel or join our mailing list. We share new insights and tutorials regularly—stay ahead of your maintenance challenges by staying informed.